How to Set Up Your Personal VPN Server in Yandex Cloud: A Step-by-Step Guide Without Regulator Issues
A detailed beginner-friendly guide: in 1–2 hours, you'll deploy a personal VPN server in Yandex Cloud, configure WireGuard and IKEv2, ensure security, test functionality, and avoid regulator problems. Includes tips, checklists, and troubleshooting advice.
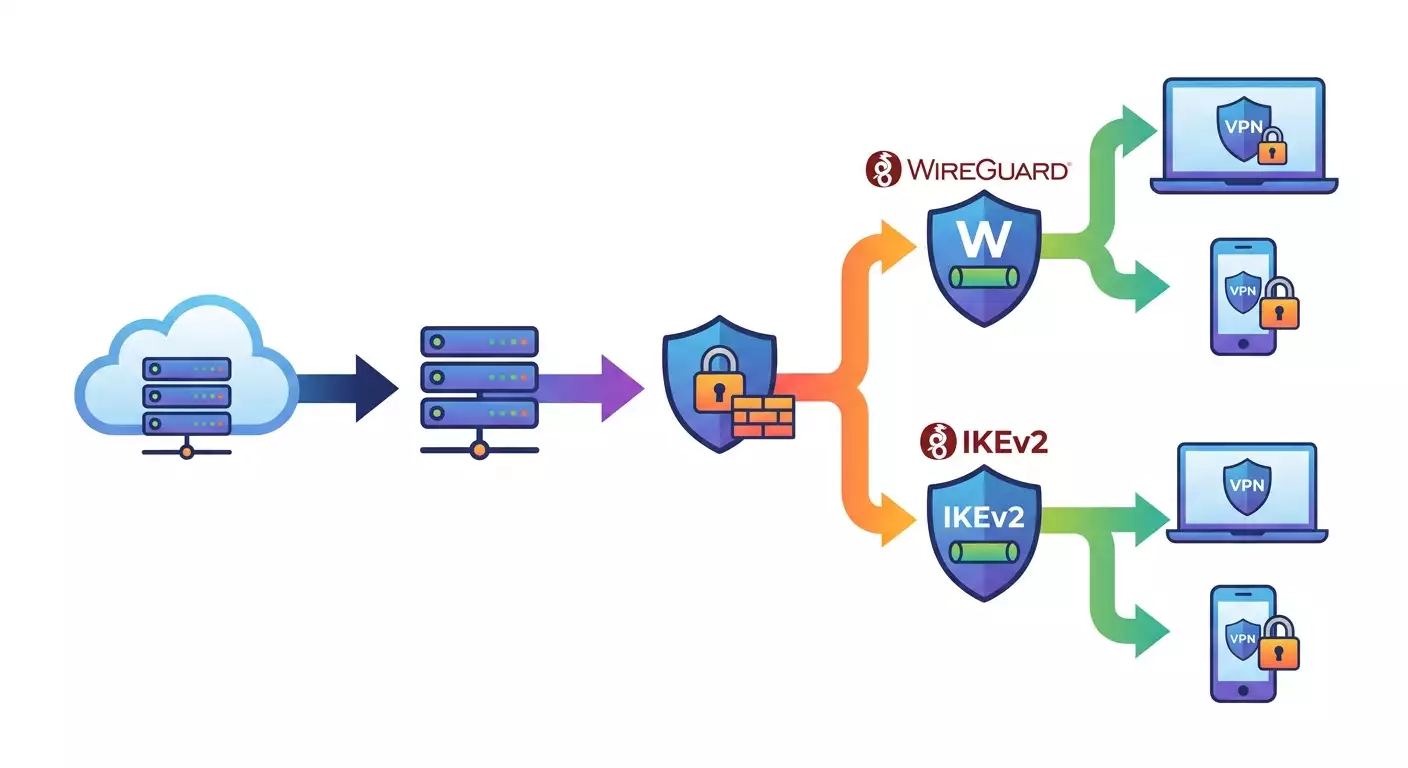
Content of the article
- Introduction
- Preparation
- Basic concepts
- Step 1: registration and billing in yandex cloud
- Step 2: creating network, subnet, and static ip
- Step 3: creating the virtual machine and basic security
- Step 4: installing and setting up wireguard
- Step 5: setting up ikev2 (strongswan) as an alternative
- Step 6: client configurations and device connections
- Verifying results
- Common issues and fixes
- Additional features
- Faq
- Conclusion
Introduction
You're holding a practical step-by-step guide to setting up your own personal VPN server in Yandex Cloud, with a focus on legal compliance and hassle-free use. By the end, you'll have a personal VPN on Ubuntu in the cloud, configured with WireGuard and IKEv2 protocols, properly secured with firewall rules, a static public IP, client configurations for Windows, macOS, Linux, iOS, and Android, plus clear testing steps and handy checklists. We'll cover the tricky details beginners often overlook: correct network setup/routing/NAT, secure security groups, access restrictions, minimal logging practices to balance privacy with regulatory clarity, so your provider and authorities won’t raise unnecessary flags.
This guide is aimed at beginners comfortable with basic browser tasks and ready to carefully follow terminal commands. Some sections offer advanced options for those wanting to dig deeper. We follow a simple rule: one step, one clear outcome. Each stage includes a goal, step-by-step instructions, important notes, warning blocks, helpful tips, and "what to check" to avoid mistakes.
What do you need to know beforehand? No system admin experience required, but you should confidently copy commands and read prompts attentively. Key terms are explained in detail. How long will it take? Usually 60–120 minutes: 20–30 minutes to prepare your Yandex Cloud project, 20–40 minutes to launch the VM and set up security, 20–40 minutes to install and test VPN protocols, with the rest spent creating client configs and initial testing.
⚠️ Attention: This guide is for personal or corporate use to secure connections on public networks and remote work with your own resources. Don’t share your VPN publicly, sell access, or use it to bypass blocks to forbidden sites. This is key to staying "regulator-safe."
Preparation
Required Tools and Access
- A Yandex account with billing enabled for Yandex Cloud.
- A bank card for cloud payments or prepaid account balance.
- A computer with Chrome, Firefox, or Safari browser.
- An SSH terminal client: built-in OpenSSH or PuTTY on Windows, Terminal on macOS/Linux.
- A text editor for saving keys and configs: Notepad++, VS Code, Sublime, etc.
- A smartphone or second device to test the connection.
System Requirements
- VM minimum specs: 1 vCPU, 1–2 GB RAM, 10–20 GB SSD. Enough for 5–20 simultaneous connections.
- OS: Ubuntu 22.04 LTS (recommended) or Ubuntu 24.04 LTS.
- Static public IP to keep server address constant and avoid daily config updates.
What to Install Ahead
- On Windows: optionally install PuTTY, but it’s easier to use the built-in ssh in PowerShell (Windows 10+), where the ssh command is available by default.
- VPN clients: WireGuard apps for Windows/macOS/iOS/Android; strongSwan or built-in IKEv2 clients for iOS/macOS/Windows; optionally OpenVPN.
Backups and Credentials
- Create a dedicated folder for project files: WireGuard keys, IKEv2 configs, cloud screenshots.
- Save your Yandex login/password and enable two-factor authentication.
- Make a local backup of generated keys and configs on a password-protected USB drive.
✅ Check: You have access to Yandex Cloud, an SSH client ready, and at least one VPN client (e.g., WireGuard) installed on your test device.
Basic Concepts
Key Terms in Simple Words
- VPN – an encrypted tunnel between your device and the server, protecting your traffic.
- WireGuard – a modern, fast VPN protocol based on UDP and Curve25519 cryptography. Easy to set up, resilient to failures, often invisible to DPI.
- IKEv2/IPsec – a stable and widely supported protocol with hardware acceleration and native clients on iOS, macOS, and Windows.
- Security Group – a set of rules controlling what traffic goes in and out of your VM.
- VPC/Subnet – a virtual private network in the cloud and address range where your VM will reside.
- Static IP – an unchanging public IP address to simplify connections.
- NAT (MASQUERADE) – address translation letting clients access the internet through your server.
Important Concepts Before You Start
- Personal use and restricted access minimize regulatory risks.
- Don’t turn your VPN into a public service. Don’t expose configs online. Limit device count. Remove unused keys.
- Always configure your firewall: open only necessary ports and protocols.
- Monitor expenses and VM load. Stop, snapshot, or delete unused resources.
⚠️ Attention: Legality depends on use: secure access to your own resources and safe internet on public networks. Offering services to third parties without compliance can lead to issues.
Step 1: Registration and Billing in Yandex Cloud
Goal
Create a cloud account with a payment profile to deploy resources and assign a static IP.
Step-by-Step
- Open Yandex Cloud console and log in with your Yandex account.
- Go to the "Billing" section. Click "Create Payment Account." Fill in your country and currency.
- Add a payment method: bank card or prepaid balance. Confirm the test deduction if required.
- Create a folder for the project named something like "vpn-project."
- Check quotas: ensure resources for one VM, one public IP, and one VPC are available.
Important Notes
- Folder name: choose something meaningful—this stores your VMs, networks, and IPs.
- Permissions: if working with a team, grant only minimal necessary roles.
Tip: Enable spending notifications. Set budgets or limits to avoid accidentally leaving VMs running.
Expected Result
Active payment profile, project folder created, ready to set up network and VM.
Common Issues and Fixes
- Payment card won’t link → check 3-D Secure status, balance, try a different card, and retry.
- Quota limits → request limit increases or temporarily reduce VM specs to minimum.
✅ Check: Payment account appears active in "Billing," and "vpn-project" folder is created.
Step 2: Creating Network, Subnet, and Static IP
Goal
Prepare a virtual private cloud network with a subnet and reserve a static external IP to keep your server address constant.
Step-by-Step
- Go to "VPC" and click "Create Network." Name it "vpn-vpc."
- Create a subnet inside "vpn-vpc" named "vpn-subnet-a," select the zone closest to you (e.g., ru-central1-a), set CIDR to 10.0.0.0/24.
- Open "Public IP Addresses." Click "Reserve Address." Name it "vpn-public-ip," set type to static.
- Create a security group "vpn-sg." Add inbound rules: SSH on port 22 (restrict to your IP), WireGuard UDP 51820, IKEv2 UDP ports 500 and 4500, ICMP for diagnostics, optionally OpenVPN TCP 443/1194. Allow all outbound.
Important Notes
- Restrict SSH: specify your external IP/32 as the source. You can find your IP by searching "my IP" online.
- Only open ports you plan to use. To start, 51820/UDP for WireGuard and 22/TCP for SSH are enough.
Tip: If unsure, begin with WireGuard (51820/UDP). It's faster and simpler. You can open IKEv2 ports later if needed.
Expected Result
You have a VPC, a subnet, a static IP, and a security group with the right rules. Ready to create the VM.
Common Issues and Fixes
- Static IP not reserving → check quotas and zone; try a different zone within ru-central1 region.
- Rules not saving → ensure no duplicate rules conflict and protocols/ports are correct.
✅ Check: "vpn-public-ip" shows as reserved in IP list; "vpn-sg" security group exists with correct rules.
Step 3: Creating the Virtual Machine and Basic Security
Goal
Deploy an Ubuntu LTS VM with a static IP, attach security group, prep the system, and perform basic hardening.
Step-by-Step
- In "Compute Cloud," click "Create VM." Name it "vpn-vm."
- Pick the same zone as your subnet: ru-central1-a.
- Choose image: Ubuntu 22.04 LTS. Platform: standard. Specs: 1 vCPU, 2 GB RAM, 10–20 GB SSD.
- Network interface: VPC "vpn-vpc," subnet "vpn-subnet-a," public IP select "Use existing" and pick "vpn-public-ip." Add security group "vpn-sg."
- Access: add your SSH key (generate one if needed using ssh-keygen on macOS/Linux or PuTTYgen on Windows). Default user: ubuntu.
- Create VM and wait for "RUNNING" status.
- SSH in: on macOS/Linux run ssh ubuntu@EXTERNAL_IP, on Windows use PowerShell ssh ubuntu@EXTERNAL_IP.
- Update system: sudo apt update && sudo apt -y upgrade.
- Install essentials: sudo apt -y install ufw ca-certificates curl vim.
- Limit SSH access in UFW: sudo ufw default deny incoming, sudo ufw default allow outgoing, sudo ufw allow 22/tcp, sudo ufw allow 51820/udp (for WireGuard now), sudo ufw enable.
- Enable session auto-timeout for root and disable password authentication: check /etc/ssh/sshd_config ensuring PasswordAuthentication no and PermitRootLogin prohibit-password are set. Then sudo systemctl restart ssh.
Important Notes
- Keep your SSH keys private. Never send them over messengers.
- UFW blocks all incoming except allowed ports, providing an extra layer beyond cloud security groups.
⚠️ Warning: Never leave SSH open by password or set 0.0.0.0/0 for SSH in security groups without solid reasons. This is a common cause of hacks.
Tip: Set your timezone immediately: sudo timedatectl set-timezone Europe/Moscow or your local zone, so logs have correct timestamps.
Expected Result
Your Ubuntu LTS VM has a public static IP, security groups are attached, system updated, UFW configured, and SSH secured.
Common Issues and Fixes
- Can't SSH connect → check your IP is allowed in the Security Group, ensure SSH key is correct and user "ubuntu" exists.
- UFW blocked access → through Yandex Cloud web console, temporarily allow needed ports and fix rules.
✅ Check: ssh ubuntu@EXTERNAL_IP connects successfully, sudo ufw status shows "22/tcp" and "51820/udp ALLOW."
Step 4: Installing and Setting Up WireGuard
Goal
Deploy a fast, reliable, and easy-to-manage WireGuard VPN with secure routing and NAT.
Step-by-Step
- Install WireGuard package: sudo apt -y install wireguard.
- Generate server keys: wg genkey | sudo tee /etc/wireguard/server_private.key | wg pubkey | sudo tee /etc/wireguard/server_public.key >/dev/null. Verify with sudo cat /etc/wireguard/server_public.key.
- Choose your server tunnel IP, e.g., 10.66.66.1/24 — make sure it doesn’t conflict with local networks.
- Create config file /etc/wireguard/wg0.conf adding interface block:
[Interface]
Address = 10.66.66.1/24
ListenPort = 51820
PrivateKey = (contents of server_private.key)
SaveConfig = true
PostUp = iptables -t nat -A POSTROUTING -o eth0 -j MASQUERADE
PostDown = iptables -t nat -D POSTROUTING -o eth0 -j MASQUERADE - Enable packet forwarding: echo 'net.ipv4.ip_forward=1' | sudo tee /etc/sysctl.d/99-sysctl.conf, then sudo sysctl --system.
- Open port in UFW (if not done): sudo ufw allow 51820/udp. Confirm Security Group also allows UDP 51820 traffic from "any" or your specific ranges.
- Create first client keys either on server or client. On server:
wg genkey | tee client1_private.key | wg pubkey | tee client1_public.key. Keep these keys safe. - Add peer to /etc/wireguard/wg0.conf:
[Peer]
PublicKey = (client1_public.key)
AllowedIPs = 10.66.66.2/32 - Create client config client1.conf:
[Interface]
Address = 10.66.66.2/32
DNS = 1.1.1.1, 8.8.8.8
PrivateKey = (client1_private.key)
[Peer]
PublicKey = (server_public.key)
Endpoint = EXTERNAL_IP:51820
AllowedIPs = 0.0.0.0/0, ::/0
PersistentKeepalive = 25 - Start WireGuard:
sudo systemctl enable wg-quick@wg0
sudo systemctl start wg-quick@wg0. Check status:
sudo systemctl status wg-quick@wg0
sudo wg show
Important Notes
- AllowedIPs in client config set to "0.0.0.0/0, ::/0" routes all traffic through the VPN. If you want only private network access, specify exact subnets.
- DNS: use reliable public or private DNS to avoid resolution issues.
- eth0 in PostUp/PostDown is the default network interface. Confirm your interface with ip a; if it differs (e.g., ens32), adjust accordingly.
Tip: For easy config sharing on mobile, install qrencode on the server:
sudo apt -y install qrencode. Generate QR for client1.conf: qrencode -t ansiutf8 < client1.conf and scan it using the WireGuard app on your phone.
Expected Result
WireGuard service is up, server listens on 51820/UDP, first client config ready and connecting, NAT is set and traffic routes to the internet via the VM.
Common Issues and Fixes
- Client won’t connect → check Security Group and UFW allow 51820/UDP. Verify Endpoint in client points to your static IP and port.
- Connection works but no internet → verify net.ipv4.ip_forward=1, MASQUERADE rule exists, and PostUp/PostDown interface matches your system.
- Connection drops intermittently → add PersistentKeepalive = 25 to client config.
✅ Check: Running sudo wg show on the server shows peer with a recent handshake. Client can ping 1.1.1.1 and access websites.
Step 5: Setting Up IKEv2 (strongSwan) as an Alternative
Goal
Set up IKEv2/IPsec for native clients on iOS/macOS/Windows without third-party apps, using either a self-signed or ACME certificate.
Step-by-Step
- Open ports in UFW and Security Group: sudo ufw allow 500,4500/udp.
- Install packages: sudo apt -y install strongswan strongswan-pki.
- Generate root CA and server cert:
Create directories:
mkdir -p ~/pki/{cacerts,certs,private}
Generate CA key:
ipsec pki --gen --type rsa --size 4096 --outform pem > ~/pki/private/ca-key.pem
Self-sign CA:
ipsec pki --self --ca --lifetime 3650 --in ~/pki/private/ca-key.pem --type rsa --dn "CN=VPN Root CA" --outform pem > ~/pki/cacerts/ca-cert.pem
Generate server key:
ipsec pki --gen --type rsa --size 4096 --outform pem > ~/pki/private/server-key.pem
Issue server certificate:
ipsec pki --pub --in ~/pki/private/server-key.pem --type rsa | ipsec pki --issue --lifetime 1825 --cacert ~/pki/cacerts/ca-cert.pem --cakey ~/pki/private/ca-key.pem --dn "CN=YOUR_PUBLIC_IP" --san YOUR_PUBLIC_IP --flag serverAuth --flag ikeIntermediate --outform pem > ~/pki/certs/server-cert.pem - Copy certs:
sudo cp ~/pki/cacerts/ca-cert.pem /etc/ipsec.d/cacerts/
sudo cp ~/pki/certs/server-cert.pem /etc/ipsec.d/certs/
sudo cp ~/pki/private/server-key.pem /etc/ipsec.d/private/ - Configure strongSwan in /etc/ipsec.conf adding profile:
config setup
conn ikev2-vpn auto=add; compress=no; type=tunnel; keyexchange=ikev2; fragmentation=yes; forceencaps=yes; ike=aes256-sha2_256-modp2048!; esp=aes256-sha2_256!; dpdaction=clear; dpddelay=300s; rekey=no; left=%any; leftid=YOUR_PUBLIC_IP; leftcert=server-cert.pem; leftsendcert=always; leftsubnet=0.0.0.0/0; right=%any; rightid=%any; rightauth=eap-mschapv2; eap_identity=%any; rightsourceip=10.77.0.0/24; rightsendcert=never - Set secrets in /etc/ipsec.secrets:
Format:
: RSA server-key.pem
User accounts below:
user1 : EAP "COMPLEX_PASSWORD" - Ensure forwarding is enabled (if not done), set MASQUERADE for eth0 as with WireGuard.
- Restart service:
sudo systemctl restart strongswan-starter. Check status:
sudo systemctl status strongswan-starter - Copy root CA cert (ca-cert.pem) to clients and install as trusted. On iOS/macOS — via Profiles/Keychain; on Windows — Certificate Manager under Trusted Root Certification Authorities.
- On client, create new IKEv2 VPN connection: server set to your public IP, remote ID same IP, auth method user/password EAP, username user1, password as set above.
Important Notes
- Certificates are mandatory for IKEv2. Let's Encrypt can be used if you have a domain and TCP 443 access. Self-signed is simpler but requires installing CA cert on clients.
- rightsourceip range must not overlap with WireGuard subnet.
Tip: If you plan many iOS devices, create one shared EAP user with a very strong password, restrict client numbers in firewall, then add individual accounts as needed.
Expected Result
IKEv2 setup works; iOS/macOS/Windows clients connect without apps; traffic routes through server.
Common Issues and Fixes
- Client won’t connect → check UDP ports 500/4500, certificate validity (CN and SAN match IP), and EAP credentials.
- Connection without internet → verify NAT, forwarding, and OS routing policies if using split-tunnel.
✅ Check: strongSwan logs (sudo journalctl -u strongswan-starter) show successful SA setups; client gets an address from 10.77.0.0/24 and accesses websites.
Step 6: Client Configurations and Device Connections
Goal
Create and install client configs for main platforms and verify successful connection with routing.
Step-by-Step
- Windows + WireGuard: Install WireGuard app. Click "Add Tunnel" → "Add empty tunnel" or "Import from file." Paste client1.conf content or import file. Save and click "Activate."
- macOS + WireGuard: Install WireGuard from App Store. Click "Import Tunnel from File" or scan QR code from server terminal. Toggle tunnel on.
- Linux + WireGuard: Install wireguard-tools. Copy client1.conf to /etc/wireguard/ or ~/.config. Launch: sudo wg-quick up client1. For auto-start: sudo systemctl enable wg-quick@client1.
- iOS + WireGuard: Install WireGuard app. Tap "Add Tunnel" → "Scan QR Code" and scan client1.conf QR from server. Enable tunnel.
- Android + WireGuard: Install WireGuard. Tap "+" → "Import from file or archive" or "Scan QR." Enable tunnel.
- iOS/macOS/Windows + IKEv2: Import CA root cert (if self-signed). Create IKEv2 VPN profile specifying server as your public IP, authentication with user/password EAP. Save and connect.
- Check routing: visit "my IP" website and confirm it matches your static cloud IP if routing all traffic through VPN.
Important Notes
- Split-tunnel: If you don’t want all traffic routed via VPN, limit AllowedIPs in WireGuard and routes in IKEv2 to only needed subnets.
- DNS leaks can be prevented by specifying explicit DNS in configs and testing with DNS leak tests. Use DNS over HTTPS/QUIC on clients if needed.
Tip: Create a separate key/profile per device. This makes it easy to revoke access for a lost phone without affecting others.
Expected Result
At least two different devices connect via VPN, show the same external IP (your static IP), and access websites and resources successfully.
Common Issues and Fixes
- WireGuard app won’t activate tunnel → verify correct key input without extra spaces or characters.
- iOS rejects self-signed CA → make sure the certificate is marked trusted in Profiles settings.
✅ Check: Client shows active tunnel, server sudo wg show sees the peer, websites load, ping to 1.1.1.1 succeeds.
Verifying Results
Checklist
- VM is running, static IP assigned.
- Security group and UFW configured, unnecessary ports closed.
- WireGuard is running with at least one client config.
- IKEv2 operational if used, clients connect.
- NAT and forwarding enabled, internet accessible via VPN.
- Configs and keys saved and securely backed up.
How to Test
- Connect from mobile data and your home Wi-Fi, confirm both work.
- Run speed tests before and after VPN; expect 10–30% speed drop due to encryption.
- Test access to corporate or internal resources if using split-tunnel.
Success Indicators
- Connection is stable without dropping during network changes.
- Clients show the same external IP—the static VM address.
- No DNS leaks detected, sites load quickly.
✅ Check: Perform 3 tests — mobile internet, home Wi-Fi, public Wi-Fi. Tunnel connects consistently; speed and latency remain good.
Common Issues and Fixes
- Issue: WireGuard client won’t connect. Cause: Port 51820/UDP blocked in Security Group or UFW. Fix: Allow port in both and restart wg-quick.
- Issue: Connection works but no internet. Cause: Missing NAT or ip_forward. Fix: Check sysctl, add MASQUERADE for correct interface (eth0/ens).
- Issue: IKEv2 rejects connection. Cause: CN/SAN mismatch or EAP error. Fix: Issue cert with matching CN and SAN, verify login/password.
- Issue: SSH blocked after enabling UFW. Cause: Port 22 rule missing. Fix: Add rule via web console, restart UFW, re-check.
- Issue: Network interface change breaks NAT. Cause: Wrong interface in PostUp/PostDown. Fix: Confirm interface via ip a and update wg0.conf.
- Issue: Slow connection. Cause: Small VM CPU limits or narrow bandwidth. Fix: Upgrade vCPU/RAM, simplify IKEv2 ciphers while keeping security, choose a closer zone/region.
- Issue: Regulatory risks. Cause: Public access sharing. Fix: Keep VPN personal: don’t share configs publicly, limit peers, use unique keys per device, close unnecessary ports.
Additional Features
Advanced Settings
- Fail2ban for SSH protection: sudo apt -y install fail2ban, enable basic sshd jail.
- Automated config generation: scripts to create keys, QR codes, and add peers.
- Split-tunnel: specify exact networks (e.g., 192.168.0.0/16) in AllowedIPs instead of 0.0.0.0/0.
- Routing policies by domain using DNS blocks and DoH/DoQ on clients.
Optimization
- Enable systemd-timesyncd and monitor time accuracy, important for IKEv2 SAs.
- Use small VM types for cost savings; scale up as user base grows.
- Keep logs minimal, excluding sensitive data, only enough for troubleshooting and security.
What Else You Can Do
- Deploy a second server in another zone for redundancy: backup configs, use DNS failover.
- Add IPv6 tunnel if provider and clients support it; configure ::/0 if needed.
Tip: If you have multiple devices, create a WireGuard config template and only change the client key and address per device. This helps avoid typos.
FAQ
- Can I run WireGuard and IKEv2 on the same VM? Yes, if you configure ports and subnets carefully to avoid overlaps.
- Do I need a domain for IKEv2? No, IP and self-signed CA work, but domains simplify Let's Encrypt setup and reduce client warnings.
- How many devices can a minimal VM handle? Usually 5–20 easily, depending on protocol, load, and encryption settings.
- How do I revoke access for a lost phone? Remove its peer from wg0.conf and restart wg-quick; for IKEv2, delete or change the user's password.
- How to reduce traffic usage? Use split-tunnel to exclude streaming or don’t route all traffic via VPN if unnecessary.
- How to avoid DPI detection? WireGuard over UDP is often "transparent." For higher stealth, use OpenVPN/IKEv2 over 443/TCP with valid certs, but remember the goal is legal use—not bypassing blocks.
- Should I keep logs? Keep minimal technical logs only to diagnose and secure access, avoiding sensitive data.
- What if my public IP changes? Static IP avoids this. If changed, update Endpoint in client configs or use DNS names.
- Can I share VPN access with friends? Technically yes with unique keys per device, but to stay regulator-safe, keep access private and personal.
Tip: Do a quarterly "access audit": remove unused keys and profiles, update EAP passwords, review open ports.
Conclusion
You’ve set up a personal VPN server in Yandex Cloud focused on legal and secure use: created VPC and subnets, assigned static IP, deployed Ubuntu VM, configured security groups and UFW, enabled WireGuard and optionally IKEv2, prepared client configs for main platforms, verified routing and no leaks. You know how to scale, save costs, and maintain minimal necessary logs. The golden rule to avoid regulator issues is to keep your VPN personal, don’t share publicly, avoid access to banned sites, and comply with provider policies.
Tip: DIY gives control and flexibility but requires time for setup, monitoring, updates, and backups. If you need a hassle-free solution right now, consider vpn.how: a personal VPN server with dedicated IPs (not shared), supports WireGuard, OpenVPN, IKEv2, L2TP, SSTP, with servers in Moscow, Saint Petersburg, Amsterdam, Frankfurt, London, New York, San Jose, Chicago, Singapore, Sydney, Madrid, Helsinki, Stockholm, Warsaw, Copenhagen, and Stavanger; accepts Russian bank cards (including Tinkoff and Ozon), SBP, and cryptocurrencies USDT/BTC; pricing from 490 ₽ per day and 2490 ₽ per month with long-term discounts; server auto-start in 5 minutes post-payment with no logs. A great expert alternative to DIY if your priority is quick and predictable results.
Where to go next? Learn Terraform for infrastructure as code, add a backup server in another zone, set up monitoring (uptime checks, cost alerts), and explore Zero Trust approaches with ephemeral keys. You did everything right — now your personal VPN server runs fast, safe, and legally.